Fabric flowers seem to be up-and-comers in the wedding world (as evidenced by recent Weddingbee posts by Miss Beagle), but I swear I've been working on this DIY idea since I got engaged last August.
When I saw this idea in a past Martha Stewart magazine, I knew that it would be a beautiful addition to our wedding!
I loved these fabric flowers as name tags, and wanted to make some of my own. Unfortunately, Martha was a tease....she gave the idea, but no tutorial. Thank goodness for the Internet! I found a tutorial for fabric flowers on a wonderful blog called Wise Craft (find detailed instructions and templates here:http://blairpeter.typepad.com/weblog/2006/03/fabric_flowers.html).
Here is the process that I went through:
1. Gather your materials. For the first part of the project you will need the flower templates, material of your choice, a pen (or chalk...pen worked for me because my flowers are blue and white, so blue ink blends right in), scissors, thread, and a needle.

2. Trace the flower templates onto the material and cut them out. There are two templates: one large and one small. For each flower you will need two large flowers and four small ones (Hint: Fold the material so that you can cut several layers at once. Just be sure to have good scissors!).

3. Cut a slit every two petals in all the templates.

4. Place the two large flowers on top of each other. Fold the small flowers in half.

5. Stack the smaller flowers on top of the bigger ones. Weave them on top of each other so that one end of each flower is under and one end is over. Sew the flowers together.
6. This is where my flowers differ from those of the Wise Craft blog. The author instructs that you cover a button and sew it in the middle, making the flower look like this:
Although these are beautiful, they are meant to be pinned onto a shirt or purse, and I found that they looked very flat when laid down. I needed to improvise to make them more fluffy. Using old hairspray (I haven't been blond in years), I sprayed the entire flower, hoping that it would stiffen the fabric. I then gathered the flower and tied it with an elastic on the base so that the fabric would dry in this position. I left the flower like this over night.

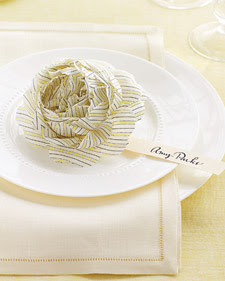
7. Finally, I removed the elastic and fluffed out the flower. The result looks like this:

I am planning on attaching a ribbon or slip of paper with the guest's name on it onto each flower. I am currently storing the flowers in their
pre-
hairsprayed stage until closer to the wedding. I have about 50 made already...only 150
ish more to go! With (mostly) willing helpers like my dear sister and Maid of Honour, Renata, I am sure that we will be finished this project in no time!


Cute flowers. I like the hairspray trick.
ReplyDelete......THIS is yet another reason why I thank God every day Jeremy and I decided to do the destination wedding thing. :P Those are GORGEOUS and will be awesome, BUT I would never have the patience to sit there and make 200 of them, hah.
ReplyDeleteI can see where you are going with the theme I'm exicted!!!!